
My First Small IoT Project: A Smart Water Tank Level Monitor

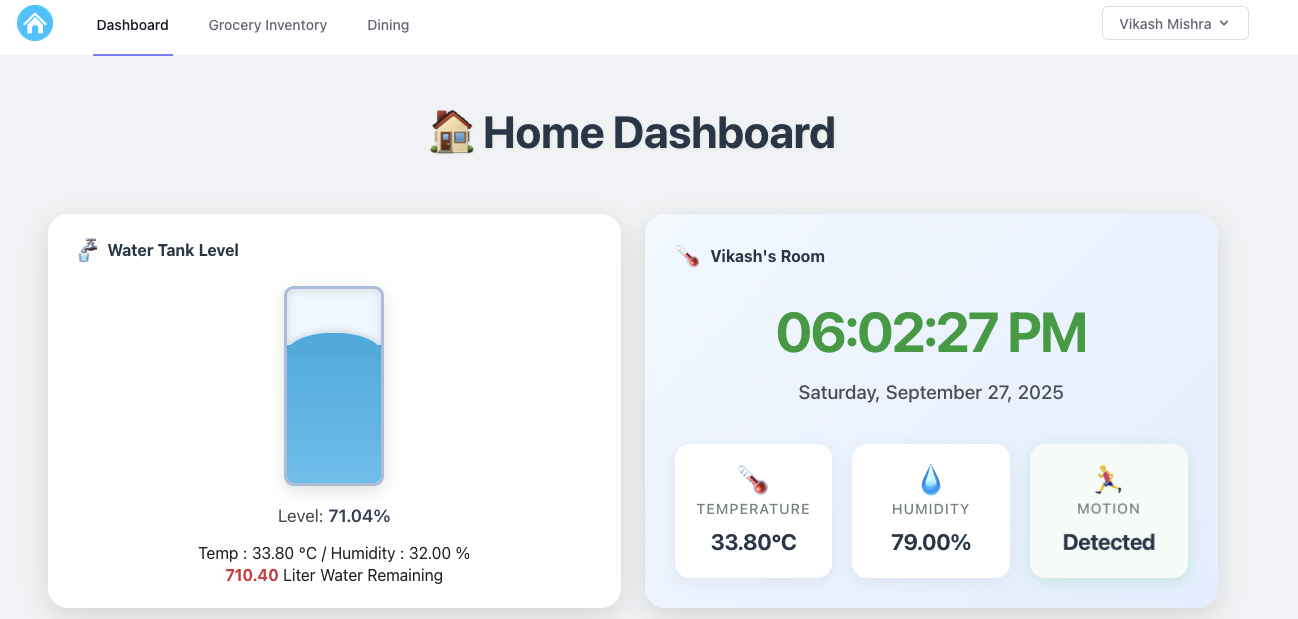
Home Dashboard

Starting your first Internet of Things (IoT) project can feel like opening a black box of circuits, code, and 3D printing fails. But the payoff—when that little red LED finally blinks, or in my case, when the water level reading finally appears on the screen—is worth every moment of frustration.

My goal was simple: stop climbing onto the roof to check the tank and instead build a reliable water level monitoring system using an ESP32.


The Hardest Part Wasn’t the Code—It Was the Plastic

When I began, I thought the coding and wiring would be my biggest challenge.
Turns out, it was the housing.

The device needed to sit securely on the tank cap and survive outdoors. That meant designing a custom, weatherproof enclosure. This is where I dove into 3D modeling with Blender—and failed many times.

I printed version after version:

  • Too small
  • Walls too thin
  • Ultrasonic sensor hole misaligned
  • Mounting screw holes stripped

Each mistake was frustrating, but every failure taught me something new. Eventually, I managed to design and print the perfect enclosure—watertight, sturdy, and snugly mounted on the tank cap.

The feeling when a digital design becomes a working physical object is simply incredible!


The IoT Brains and Sensory Organs

Here’s the simple but powerful hardware setup I used:

  • ESP32 Development Board – The brain of the project. Powerful, has built-in Wi-Fi (great for data logging or sending alerts), and beginner-friendly with the Arduino IDE.
  • Ultrasonic Distance Sensor (HC-SR04 or similar) – The core sensor. It measures the distance between the sensor and the water surface.
  • DHT11/DHT22 Sensor – Bonus sensor for temperature and humidity inside the enclosure. Not required for water monitoring, but great for learning to integrate multiple sensors.

From Distance to Liters: The Simple Physics

The trick is converting the distance measured by the sensor into meaningful values like water level percentage and remaining tank capacity.

Known values in my setup:

  • Distance from sensor to bottom (Dfloor) = 120 cm
  • Distance when tank is empty (Dempty) = 20 cm
  • Tank capacity (Vcapacity) = 1000 liters

Step 1: Usable Water Height
Hmax = Dfloor – Dempty = 100 cm

Step 2: Current Water Height
Hwater = Dfloor – Dmeasured

Step 3: Water Level Percentage
Level% = (Hwater / Hmax) × 100

Since Hmax = 100 cm, every 1 cm of water = 1% full.

Step 4: Volume Remaining
Volume = (Hwater / 100) × Vcapacity

With a 1000-liter tank and 100 cm usable height, every 1 cm of water ≈ 10 liters.


Connect with Me – Buy This Smart IoT Project!

I’m passionate about making practical IoT solutions accessible and affordable.

If this project excites you, you don’t need to build it from scratch—I’ve already developed and tested a ready-to-install Smart Water Tank Level Monitor. It’s compact, weatherproof, Wi-Fi enabled, and fully calibrated for home use.

💧 This device will save you time, effort, and water by giving you accurate tank readings instantly.

👉 If you’d like to purchase one, simply connect with me:
📩 mail@vikashmishra.online

The ESP32 Code, Web Integration, and Hosting

The ESP32 code powering this project not only calculates the water level but also integrates Wi-Fi connectivity. To ensure efficiency, it uses a smart reporting algorithm—sending data to the server only when the water level changes by 1% or more. This saves bandwidth and reduces server load.

For hosting, I use CLOUDPOKO.com

Why CLOUDPOKO?

  • Super-fast, reliable servers
  • Affordable plans perfect for IoT API calls
  • Easy setup for PHP-based dashboards
  • Outstanding uptime and support

CLOUDPOKO has been the backbone of my IoT setup. If you’re planning to host your own IoT projects or even personal websites, I highly recommend them.

On the backend, I built a simple PHP dashboard to collect sensor data and display real-time water levels. It’s lightweight, efficient, and works seamlessly with CLOUDPOKO hosting.

(I’ll share the complete ESP32 (Arduino) code in my next blog.)
Better Late Than Never: My DIY Smart Home Revolution is Underway!

home automation

NOTE: All the materials/software/solutions I’ll be using in this project will be open-source and designed by me; no ready-to-use solutions will be used. It will be a complete personal project.

Introduction:

Ever felt like you missed the boat on the smart home trend? For years, I watched from the sidelines as friends and tech enthusiasts automated their lives. I’ll admit it – a part of me thought, “It’s a bit late for me.” But that feeling has given way to a new obsession: building my own complete, custom home automation system from the ground up.

This isn’t about buying a few smart plugs and calling it a day. This is about a full-scale home revolution, a project fueled by a desire for convenience, security, and a little bit of tech wizardry. If you’ve ever dreamt of a home that truly works for you, stick around. This is my journey, and it’s just getting started.

The Master Plan: A Home That Thinks for Itself

My goal is a holistic ecosystem that integrates every aspect of my daily life. Forget about fragmented apps and devices. My system is designed to be the brain of the house, handling everything from security to sustainability.

Here’s a breakdown of the core features I’m building:

  • Your Personal Digital Butler: My system will be the ultimate notification hub. Get instant alerts for everything: a package delivery, a water leak, or even a simple reminder to take out the trash. No more missed events, no more forgotten tasks.
  • The Unlocking Experience: I’m ditching the traditional key. With automatic door mechanisms and a fingerprint sensor, entry into my home will be seamless and highly secure. The door will know when I’m home and lock itself behind me, offering peace of mind.
  • Climate Control, Perfected: No more fiddling with the remote. Using temperature and humidity sensors, my system will intelligently manage the existing AC units to maintain a perfect, comfortable climate, all while optimizing energy usage.
  • Water Management, Simplified: Water is a precious resource. My system will monitor the water tank level in real-time, preventing overflows and automating the refilling process for efficient, hassle-free water management.
  • Smarter Appliances, Smarter Living: I’m putting an end to manual tasks. Using relay modules, I’ll control lights, fans, the washing machine, and other appliances remotely. Imagine a routine where the coffee maker starts brewing just as your alarm goes off.
  • The Guardian of the Network: A stable, secure network is the backbone of a smart home. My system will actively monitor the network, alerting me to any connectivity issues or suspicious activity, keeping my digital life safe.
  • Energy at a Glance: I’m a firm believer in “you can’t manage what you don’t measure.” I’ll be monitoring electricity availability and consumption to gain valuable insights, helping me identify opportunities to reduce my power bill and environmental footprint.
  • My Indoor Garden’s Best Friend: For the plant parent in me, I’m building a smart plant watering system that will use moisture sensors to deliver the perfect amount of water, ensuring my green friends thrive without constant supervision.
  • Automated Sentimental Reminders: Life gets busy. My system will be a digital memory keeper, automatically sending out personalized greetings for birthdays and anniversaries, making sure I never miss a special moment.

The Tech Behind the Magic

The heart of this entire operation is a powerful Raspberry Pi 5 server. For security, this server will be completely isolated from the direct internet, running all automation tasks over my local network (Wi-Fi and LAN). Remote access will be exclusively through a secure VPN connection, ensuring all my data stays private and protected.

The components I’m using are a tinkerer’s dream: ESP32 microcontrollers, distance sensors, light sensors, and a host of other peripherals.

But what’s a smart home without a command center? All the data and controls for this entire ecosystem will be displayed on a dedicated, always-on 10-inch screen. This central hub will provide a real-time overview of every system and allow me to control everything with a simple touch.

Join the Smart Home Revolution

This project is more than just a hobby; it’s a testament to the power of DIY and the incredible potential of technology to simplify our lives. I’ll be sharing every step of this journey, from the wiring nightmares to the triumphant moments of a fully automated routine.

If you’re inspired and looking to build a similar setup, I’m excited to announce that I’ll soon be offering the hardware and custom services I’m designing. To stay in the loop and get early access, drop me an email at mail@vikashmishra.online.

The era of the truly intelligent home is here, and I’m proof that it’s never too late to start building your own.